Monday, December 14, 2015

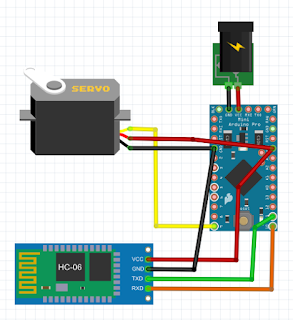
Bionic Hipster Glasses - the code behind

If you want to make something special for this Halloween, this is your chance!
For a few lines of code,

Just copy-paste the code blow into an new Arduino sketch.


//          ____   _                _        ______                
//         / __ ) (_)____   ____   (_)_____ / ____/__  __ ___      
//        / __  |/ // __ \ / __ \ / // ___// __/  / / / // _ \     
//       / /_/ // // /_/ // / / // // /__ / /___ / /_/ //  __/     
//      /_____//_/ \____//_/ /_//_/ \___//_____/ \__, / \___/      
//                                              /____/             
//      
//              Created by Yair Kapach 2015
//        For build details and more, please visit: 
//         http://www.youtube.com/user/microstrat
//           http://makestuffordie.blogspot.com/
//
//    you're welcome to hack it, break it and have fun !
#include <Servo.h>
#include <SoftwareSerial.h>

#define SERVO_PIN 9
#define BT_RX_PIN 10
#define BT_TX_PIN 11

Servo eye;
SoftwareSerial bluetooth(BT_RX_PIN, BT_TX_PIN);

int pos = 60;  
int lastPos = pos;

void setup()
{
  bluetooth.begin(9600);                // initialize communication
  eye.attach(SERVO_PIN);                // initialize servo
  eye.write(pos);                       // look ahead :)
}

void loop()
{
  if (bluetooth.available()) {           // try and read if available
    int data = bluetooth.read();         // read a single character
    pos = map(data, '0', '9', 10, 110);  // convert digit to degrees
  }
  if (lastPos != pos) {                  // don't resend the same values
    lastPos = pos;
    eye.write(pos); 
  }
}


Download any Bluetooth terminal app, I preferred one with custom hotkeys, you can set buttons 0-9 to send any data once clicked.
Since our protocol is quite dumb, button 0 sends '0', 1 sends '1' and so on...

Happy Halloween.
Monday, June 8, 2015

Playing around with Peltier

A friend brought me a Peltier element (see Thermoelectric cooling) he had lying around.
I thought it would be cool (pun intended) to have a DIY beverage cooler on my desk.
All you need is: an aluminum heat-sink, a 12V fan and few LEDs.
My 9 years old kid soldered everything in parallel and of course burned his hand (please don't report to the social services, we only learn by making mistakes)

14 degrees Celsius is fine, but why not kicking it up a notch.
After replacing the linear power supply (500mA) with a PC power supply, we have 3 degrees less.
The next step would be finding a CPU fan + heat-sink and 3D printing an enclosure.

Tuesday, May 19, 2015

When Hipsters and Cyborgs meet


Just got back to an old project, a Halloween costume. It used to be a Bluetooth-controlled-pirate-eye, but it wasn't that comfortable to wear.
So I decided starting everything from scratch:
  • Only few electronic components.
  • Less than 50 lines of Arduino code.
  • Fully 3D printed parts (no screws, nuts etc.)
  • Printable on a 10cm^3 printer (~4'')

Soon available on Thingiverse...

Friday, May 15, 2015

Hakko FX888D soldering station - 220V

My good old soldering iron just passed away, I thought it would be nice get a decent quality soldering station for about $100. I took Dave Jones's (EEVBlog) positive review on the HAKKO FX888D and decided buy one.

Our friends over the US can get it for about $90 on Amazon, but the EU/Asian 220V (genuine) version is hard to find.
It's amazing! Ali-express and eBay are full of Chinese knockoffs which are very similar to the real thing.
Take a look at Hakko's website and see the note on counterfeit products.


Some folks on his forum has an interesting thread about the 220V version.


If you're bold enough, egressvk has found a way converting the PSU from 110V to 220V:


Eventually, I decided to get it from an authorized local dealer, twice the price as the fake one.

Friday, May 8, 2015

The Arduino source code is now available on: https://github.com/MakeStruffOrDie/uArcade

Cabinet STL are not that perfect, but what the heck, software developers have debuggers, Makers have X-Acto and elbow grease...

Tuesday, May 5, 2015

uArcade - 3D printed desktop arcade


Sure, Xbox and PS are great, 3D graphics is amazing, but all of us who grew up in the 80's, can still enjoy 8bit games.

But why going eight when you can play one bit ... :)
Just started a new project, palm size arcade cabinet.

All you need is a tiny Arduino, an OLED display and a rotary encoder.
For the cabinet, it's nice to have 3D printer, but you can always use other matterials.

Stay tuned for more,
Make stuff or die trying....